How to Apply Your Sticker/Decal
Equipment Needed
- Soap and water
- Lint free towel or clothe
- A credit card or a vinyl squeegee
Steps
- Clean the surface you want to apply the stick to thoroughly with soap and water. Dry completely with a lint free towel or cloth and allow to air dry.
- Once the surface is clean and dry get your sticker and pull off the backing of the sticker. This is the waxy piece of paper underneath your sticker. Be careful after you pull off the backing, the sticker will stick to anything that is touches.
- Line up the sticker properly; place one side down, then slowly credit or squeegee from left to right until the whole sticker is down. Go over the whole sticker pushing out any air bubbles or parts that are not all the way down.
- Carefully and slowly pull off application tape making sure all sticker parts are staying on the medium you are applying the sticker to. If something not sticking (which is rare, usually only for real small pieces) go back and reapply with squeegee or credit card directly on part not sticking and then try again, repeat until stuck down.
- Go over the whole sticker lightly with squeegee or credit card.
Camaro Quarter Gill Decals (Vents) Installation Instructions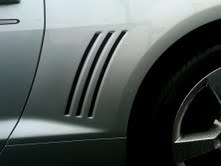
- DF – Driver FRONT
- DM – Driver MIDDLE
- DR – Driver REAR
- PF – Passenger FRONT
- PM – Passenger MIDDLE
- PR – Passenger REAR
- Clean area with alcohol to remove any wax and dirt.
- TEST FIT. This will allow you to see where the decal goes on the car and how you need to curve it to fit best. Location of decal is on the 1/4” flat of the vent. Some have found trimming the transfer tape closer to the graphic makes curving easier.
- Peel backing off gill decal.
- Start at the TOP of the gill and line it up with the FLAT of the vent, holding the bottom OUT from the car. Start pressing the decal onto the surface with your thumb, moving downward. Curve the decal as needed to match vent.
- Rub down firmly once entire vent is in place.
- Peel off the covering transfer paper from top to bottom carefully.
- REPEAT for each of the remaining gill. Take a photo and share it with us!
Camaro Rocker Decals Installation Instructions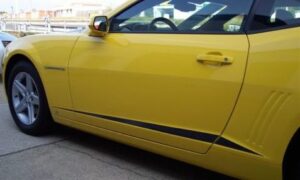
- Step 1: Clean area on car with alcohol to remove any wax and dirt.
(If you prefer, a soap and water mixture may be applied to the vehicle to make placement easier. DO NOT allow the backing paper to get wet! This will require some drying time once finished. The mixture should be a drop or two of soap in a spray bottle full of water. It does NOT need much soap!) - TEST FIT. This will allow you to see where the decal goes on the car and how you need to curve it to fit best. Confirm decal placement by placing it onto desired area.
NOTE: IT MAY BE HELPFUL TO HAVE ANOTHER PERSON FOR ASSISTANCE WITH LONGER DECALS - Using a tapeline along a straight edge of the graphic may help you stay straight when you apply the graphic.
- Tape the graphic in place, if not using water and soap, and (starting at one end) peel a small portion on the backing paper away and apply graphic to car (leave the top protection tape till finished). A squeegee, or credit card should be used to press down graphic to eliminate air-pockets/bubbles.
- Once that portion is securely on the car, reach under the graphic and pull the backing paper further down the graphic and apply that section. Squeegee down the graphic as you go.
- Continue until graphic is completely installed.
- Re-squeegee the entire graphic to be sure no areas were missed.
- Remove the transfer/protection tape in a smooth motion, left to right. Be sure the graphic remains on the vehicle at ALL times
- The graphic should be kept clean and NO harsh chemicals used on it. Spray wax would be recommended over a paste style wax if desired. Repeat for each Camaro decal. Take a photo and share it with us!
Mercury Motor Cover Decals Installation Instructions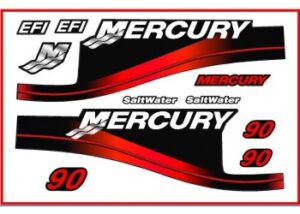
Kit Includes: 11 Pieces
2 Large Fins
2 Small HP Numbers
1 Large HP Number
2 “Saltwater” Decals
2 “EFI” Decals
1 “Mercury” and 1 “M” Logo
(Optimax Kits – 2 “Optimax” and 2 “Offshore”) – 13 Pieces
- Clean area with alcohol. All surfaces must be free of wax, dirt, and old adhesive residue before applying your vinyl graphics to ensure proper adhesion. If you don’t make sure the area is clean, then peeling or lifting can occur.
- TEST FIT. This will allow you to see where the decal goes on.
- Application can be completed dry (without use of liquid). We use premium grade outdoor air release vinyl, and then laminate it with a clear UV protectant for marine use.
- Remove Paper Backing.
- Line it up, then start pressing the decal onto the surface. Start from one end and carefully press the decal (use rubber or clothe covered squeegee/press) into its desired position while working out air pockets.
- Rub down firmly once in place. (We are not responsible for unprofessional installation mistakes)
Take a photo and email it to us or tag us!